Overview
This make-from-stock exercise produced a working adjustable wrench using only hand tools and basic machining. I marked out the profile on sheet metal and stainless steel, then created the handle and lower jaw with hacksaw, files, tin snips and careful finishing. The upper jaw was rough-cut, then milled to final geometry and tapped to accept a threaded rod. Rotation of a brass thimble drives the rod, moving the upper jaw up/down against the fixed lower jaw. The focus was on clean fits, square faces, and thread alignment so the jaw motion feels smooth without binding. The project strengthened my fundamentals in layout, hand skills, and simple mechanisms; getting from flat stock to a precise, functional tool with minimal equipment.
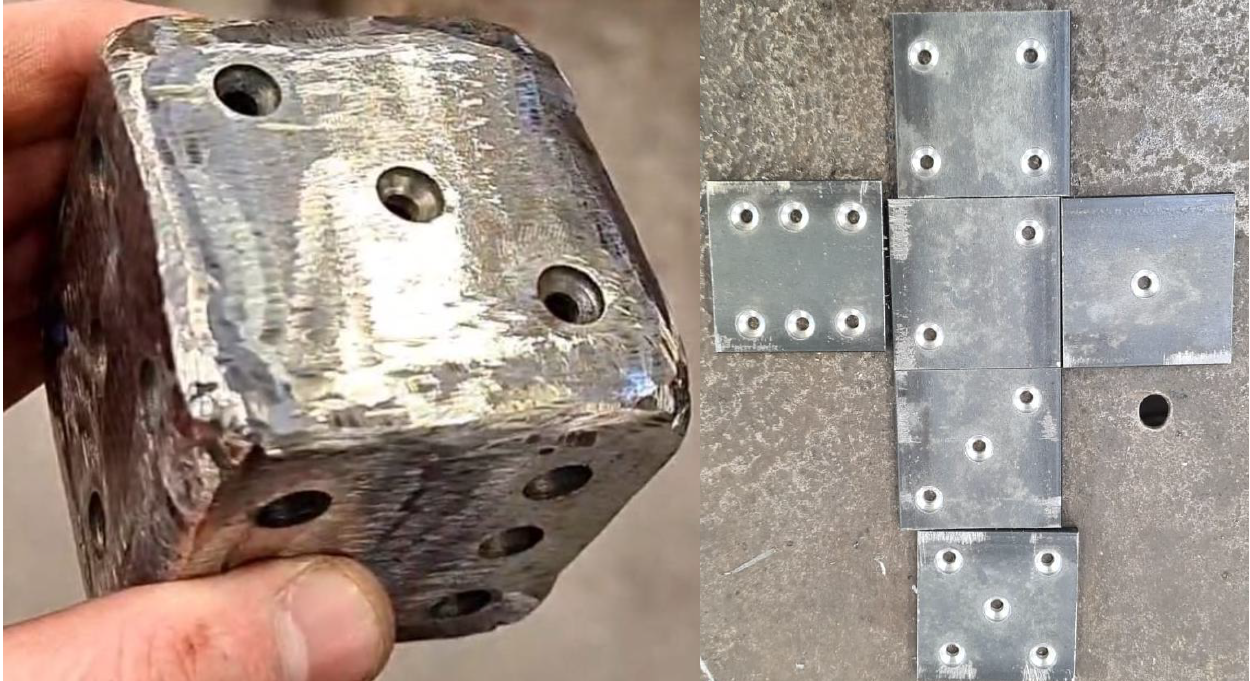
I also fabricated a six-sided die from stainless steel plate, focusing on accurate pips and clean finishing. Each face was drilled and countersunk to represent numbers 1–6, then the six plates were MIG-welded into a cube (about 120 A, from memory). After welding, I removed spatter with an angle grinder + wire wheel and used a belt sander to blend the seams and polish the faces while controlling heat to avoid warping. The result was a rigid, square cube with crisp pip geometry and an even surface finish good practice in weld sequencing, heat management and post-weld finishing on stainless.
Process
- Layout & stock prep: Marked out profiles and hole patterns on sheet/stainless, leaving allowance for file-to-line accuracy.
- Hand fabrication (wrench): Cut the handle and fixed lower jaw with hacksaw/tin snips; filed to final geometry and kept faces square/parallel.
- Machining & threads (wrench): Rough-cut the sliding upper jaw, then milled to size; drilled/tapped for a threaded rod driven by a brass thimble to adjust jaw position.
- Fit & assembly (wrench): Deburred, polished sliding faces, set backlash, and verified smooth jaw travel without play.
- Drill/countersink (die): Produced pip patterns 1–6 with consistent depth and finish on each stainless face.
- Weld & form (die): Tack-assembled and MIG welded the six plates into a cube (~120 A remembered), sequencing welds to control heat and distortion.
- Finish (die & wrench): Removed spatter with wire wheel, blended on belt sander, broke sharp edges, and did final surface refinement.
Outcomes
- Functional tools: The wrench adjusts smoothly and clamps reliably; the die is rigid, square, and visually clean with crisp pips.
- Build quality: Accurate hand-fitting on the wrench prevents binding; controlled heat/weld order on the die preserves face flatness and squareness.
- Finish: Even surface sheen and blended seams on the die; comfortable edges and tidy profiles on the wrench.
- Key learnings: Leave stock for file-fit, tap perfectly perpendicular, polish sliding interfaces (wrench); manage heat input and weld sequence, then finish progressively for uniform results (die).
Gallery